
Install or update your Garmin map
TrakUpdate installs and updates your TrakMaps purchase on your computer and GPS for you. Download it, run it, and follow the prompts — that's the whole job.
Download TrakUpdate for Windows On a Mac? Download for Mac
- 1. DownloadGrab the installer above — it matches your computer automatically.
- 2. Run itOpen the file and follow the setup steps, then launch TrakUpdate.
- 3. RelaxPlug in your GPS or card. TrakUpdate handles the install and updates.
Set up your GPS
A one-time setup after TrakUpdate finishes. Answer two questions and we'll show only the steps that apply to you.
Insert the card
Insert the microSD card into your GPS unit's card slot - use the SD adapter if your unit takes full-size SD cards.
Transfer the map to your GPS
Downloaded maps are sent to your unit with Garmin MapInstall (installed with BaseCamp).
- Connect your GPS (or its card) to the computer
- Windows: press the Windows key on your keyboard > type MapInstall > select Garmin MapInstall
Mac: Finder > Applications > select Garmin MapInstall - Follow the steps in Garmin MapInstall to send your TrakMaps map to the unit
Enable the map
- Turn on your GPS unit
- Choose Setup or Tools or Settings
- Choose Maps
- Choose Select Map or Map Information or Configure Maps
- Enable your TrakMaps map and disable all other maps
Certain units may present these menus differently. Refer to your Garmin Owner's Manual for more information.
Pick a routing mode
Without this, the GPS unit may generate a straight line as the route instead of following trails.
- Choose Setup or Tools or Settings
- Choose Routing
- Select Car or Automobile
Certain units may present these menus differently. Refer to your Garmin Owner's Manual for more information.
Raise the level of detail
- Choose Setup or Tools or Settings
- Choose Maps
- Choose Advanced Map Setup
- Set Detail to Highest
If your GPS unit slows down after this step, a lower level of detail is recommended.
Planning trips on your computer?
You can view your map and plan routes in Garmin BaseCamp. Most people never need this - it's here if you do.
Open BaseCamp with your map connected
Connect your GPS (or insert the map's card into your computer), then:
- Windows: press the Windows key on your keyboard > type BaseCamp > select Garmin BaseCamp
- Mac: Finder > Applications > select Garmin BaseCamp
Select the map
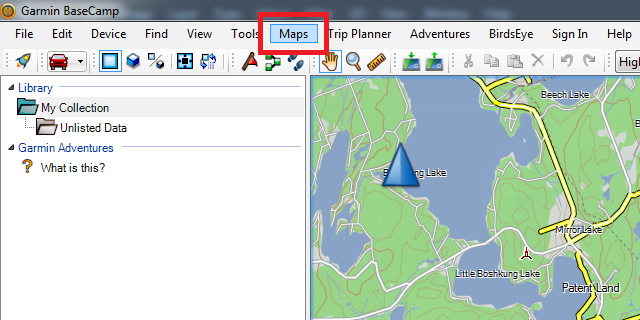
In the top menubar, choose Maps > [Your TrakMaps map]
Raise the level of detail
- Windows: click the View menu > Toolbars > check Detail Level, then set the new dropdown below the File menu (usually Medium) to Highest
- Mac: move the Detail slider (located below the map) to the right
Need a hand?
Our support team installs these maps every day - we'll walk you through it.
Start a Conversation Learning Center